Accidentally Running Gaming Monitors At 60 Hz For Weeks
Embarassed readers tell me they sometimes forget to switch the refresh rate. You got a gaming monitor as a holiday or birthday gift. Windows doesn’t always automatically use the highest Hz.
High-Hz is slowly becoming more mainstream thanks to new 120Hz iPads and early HFR standardization. Even now 144Hz being included in certain business monitors. More people than ever have access to high-Hz unbeknownst to their knowledge. You discover you have a “144 Hz” monitor model but…
*Estimated Refresh Rate. Refresh Rate Detection is not always accurate in web browsers.
Reports of people accidentally leaving 144 Hz monitors at 60 Hz because even its “plain 60 Hz” is amazingly clearer than the old monitor. But did you know that it can get even better?
10 Steps To Switch Refresh Rates Under Windows 10
Windows 10 requires several steps to switch display refresh rates:
- Click Start Menu Icon, then click Settings Icon
![]()
- Click “System” for Display Settings
![]()
- You will see the Display configuration window.
![]()
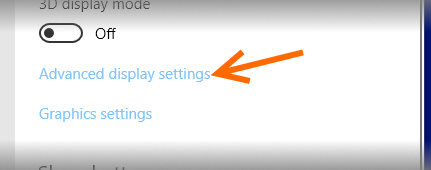
- Scroll down to click “Advanced display settings”
![]()
- Observe the refresh rate for your new display may be incorrect!
Next, click “Display adaptor properties”
![]()
- The graphics adaptor information will display. Click the “Monitor” tab.
![]()
- Open the “Screen refresh rate” list and select the highest refresh rate you see.
![]()
- Click OK. Your screen will switch to the new refresh rate!
- Click “Keep Changes” when this pops up.
![]()
- Now visit www.testufo.com to test out the new refresh rate!


This is the generic way of switching refresh rates on any Windows 10 system for any GPU.
A Faster Way For NVIDIA and AMD Graphics Cards
Due to this, vendors have offered shortcuts to switch refresh rates.
These instructions are for NVIDIA Control Panel.
- Right click on an empty area of your Windows desktop.
- A menu will pop up. Click “NVIDIA Control Panel“.
![]()
- In NVIDIA Control Panel,
Click “Change Resolution”,
Select the display to change,
Select the Resolution,
Select the Refresh Rate,
Click Apply.![]()


Now you are enjoying the highest refresh rate your monitor is capable of offering!
To test out your high refresh rate, visit Test UFO.
Problems?
Q: I have a 144 Hz monitor but the 144 Hz setting is not showing up
A: Try a different video cable. a dual-link DVI cable (144Hz), or a DisplayPort cable (144Hz, 240Hz)
Q: But the high-Hz setting still does not show up!
A: Try a different video port on your GPU. Make sure you have a recent AMD GPU or NVIDIA GPU.
Q: I’m using a DVI cable. The picture goes completely pixellated at 144 Hz.
A: Get a new “dual-link” DVI cable. Sometimes the DVI cable included with the monitor fails.
Q: Control Panel says I am at 144 Hz but TestUFO Refresh Rate says 60 Hz
A: You have now fixed your refresh rate, but not the browser. Please see TestUFO Stuck At 60 Hz FAQ.
Q: I am still having problems!
A: Visit Blur Busters Forums and post a message asking for help!
